I initially set up my AltaRoute10 router with a Docker-based software controller. Later, I decided to purchase the Alta Hardware Controller, expecting it to provide a standalone, integrated management experience without reliance on cloud services.
When I attempted to set up the hardware controller, my router was in a reset state, defaulting to the 192.168.x.x subnet. Since the router wasn’t yet fully configured, I couldn’t reliably determine its IP address.
The hardware controller requires a connection for setup, but without knowing the router’s IP, I had no clear way to access the controller.
The only reliable option to proceed was to use the Alta mobile app in Bluetooth mode, connecting my phone physically to the router network.
Frustration with App-Dependent Setup
The default IP range for the Route10 router is 192.168.x.x, and given that it is not set up initially, I don’t know the IP of the Hardware Controller.
The only way to proceed with the setup is through the mobile app using Bluetooth, which creates an external dependency when the hardware controller was purchased with the expectation of complete independence.
Issues Observed
1. Setup Failures
The mobile app frequently failed during the setup process, requiring multiple retries.
This was primarily due to my existing network being configured for 10.0.x.x (used by my access points), while the router and controller defaulted to 192.168.x.x.
2. Dependency on Both Bluetooth and IP
The app relies on both Bluetooth and IP access simultaneously.
If the phone wasn’t physically connected to the router’s network (e.g., via Wi-Fi), the app couldn’t establish a connection with the controller despite the Bluetooth link.
3. Unpredictable Success
After numerous failures and retries, the setup eventually worked seemingly at random, allowing me to connect the controller and router.
4. Persistent IP/Subnet Issues
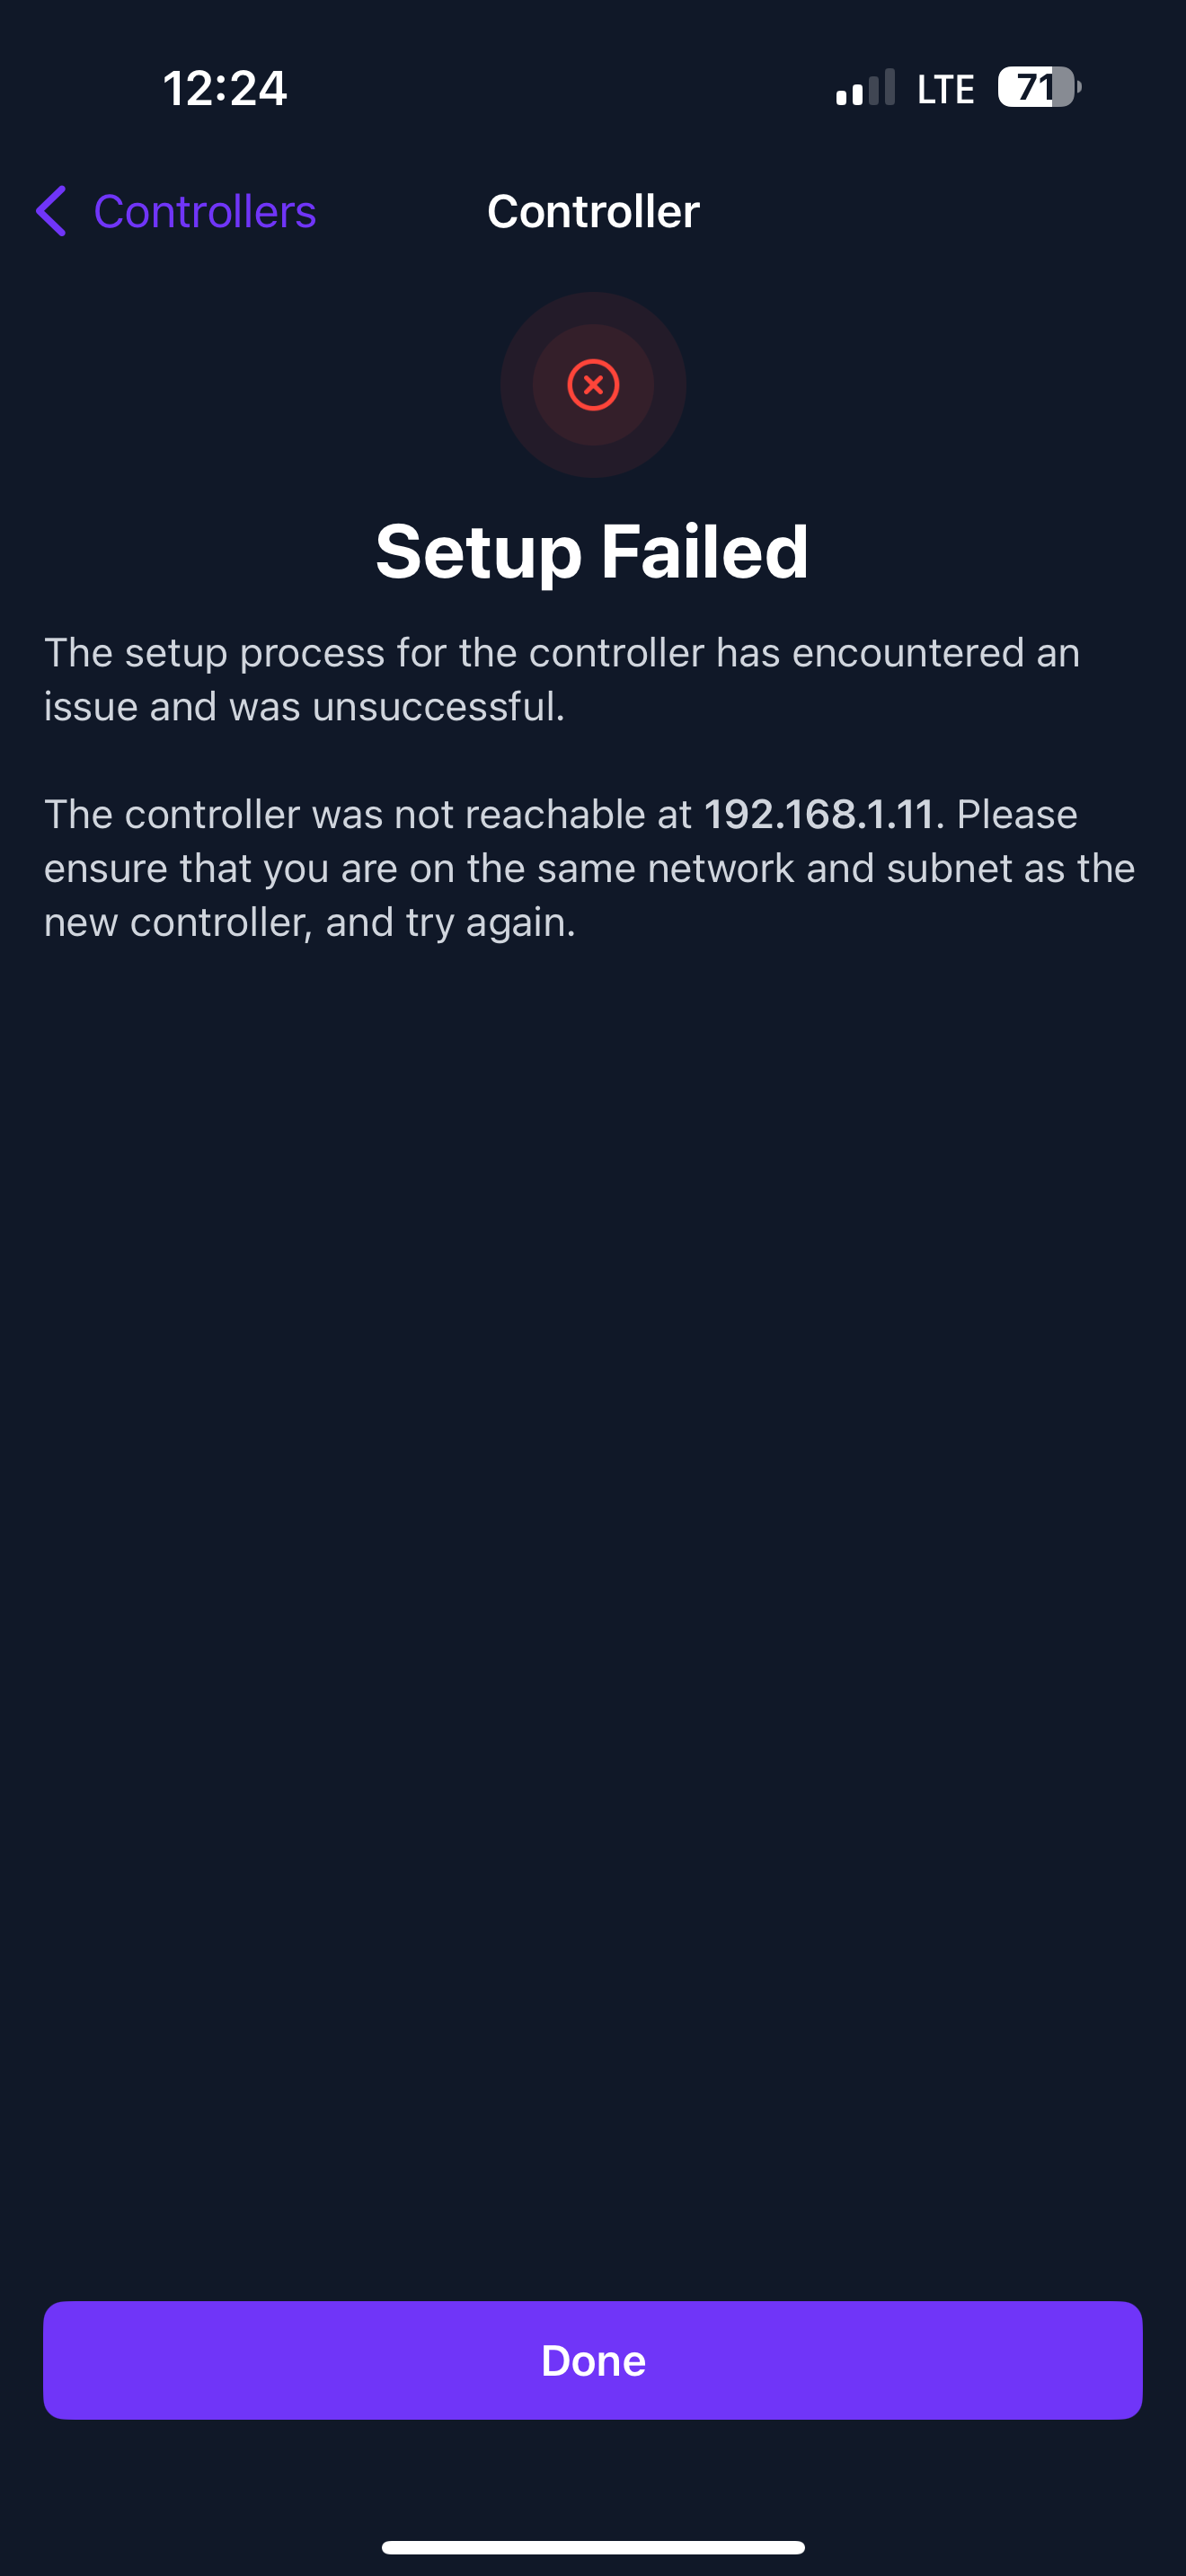
Once the controller was set up, the router defaulted to 192.168.1.1, and the hardware controller defaulted to 192.168.1.11.
Attempts to change the router’s IP range to 10.0.x.x via the web interface and mobile app encountered several issues:
The web interface didn’t display options to make the necessary changes.
Changes made via the mobile app (e.g., updating the default VLAN 1 to 10.0.0.1/24) didn’t persist after saving and restarting the router and controller.
Despite configuring it otherwise, the router remained stuck on the 192.168.x.x subnet.
5. Cloud Dependency & Limited Independence
Resetting the hardware controller required re-activating it through Alta’s cloud service repeatedly, contradicting the expectation of an independent, self-sufficient controller.
6. Incompatibility with Non-Alta Devices
I’m using Wi-Fi 7 access points (TP-Link Omada) instead of Alta’s access points. This has resulted in:
Limited visibility into device activity and network information in the controller interface.
A degraded user experience, as some features appear to rely on Alta’s own access points to function fully.
7. Overall Experience
The setup process was far more frustrating than expected.
I purchased the hardware controller expecting simplicity and independence, but the reliance on the mobile app, repeated failures, and lack of full compatibility with third-party devices made the process unnecessarily complex.
Suggestion:Enable Custom LAN IP Configuration During Initial Web Setup
Current Limitation:
When accessing the Route10 web interface at 192.168.1.1, the setup process focuses on configuring internet connectivity (WAN settings) such as selecting the WAN port and connection type (e.g., DHCP or static). However, it does not allow users to customize the router’s LAN IP range during this step.
Suggested Improvement:
Include an option in the initial web-based setup wizard to customize the LAN IP range (e.g., 10.0.x.x) alongside the WAN configuration.
How This Helps:
Allows users to immediately set up the router on their desired subnet, avoiding conflicts with existing devices on the network.
Simplifies the integration of additional devices like the hardware controller, as the network can be pre-configured with the appropriate IP range.
Reduces dependence on the mobile app for adjusting network settings later.
Implementation Details:
Add a LAN Setup step to the existing web wizard where users can:
Specify a custom LAN IP range and subnet (e.g., 10.0.0.1/24).
Enable DHCP with the ability to configure its range (e.g., start and end IPs).
Ensure these changes are applied seamlessly before completing the wizard, so the router is immediately accessible on the custom LAN range.
Why It Matters:
This small addition to the web interface would address many of the frustrations users face when integrating Route10 into existing networks, making the setup process more efficient and user-friendly.
I still could not fix the IP issue and I am stuck with 192.168.x.x
thanks for putting in the request. I believe this is an urgent/show stopping issue to be addressed. I am not sure to keep the hardware controller or return it as without this being fixed, it is not worth investment of time and headache. Docker Container is easy as at least there one can change the Controller IP.
Sorry for the troubles you’ve encountered here. We can assure you that we have many Route10 devices coming online every day that do not encounter any setup issues whatsoever.
(1-4) We are unable to reproduce the setup and subnet change failures you are seeing. Have you watched our Route10 setup video? https://youtu.be/dDt5gB50rLQ?si=ioRqwUlf2hSWBlr- . If there happen to be any network topology issues, Bluetooth is there to work around any issues you may have. If you can describe your network topology further, I can try to understand what might be going on.
There must be something more complicated than the average network which causes your unpredictable behavior.
Changing subnets from the default 192.168.1.x subnet is always problematic no matter what router brand you use, so it’s best to “reboot the network” when doing so. We are unable to reproduce the “sticky 192.168.1.x” subnet issue that you describe above. We do have plans to add VLAN1 subnet selection to the initial setup process to make this easier, but it is currently possible as long as you take the change one step at a time, and power cycle things each time the subnet is changed (once again, this is common with all routers).
5: @mark The Local Controller reliance on the cloud is actually to enhance the initial Alta user experience, as you may understand that it is a much more complicated process to configure a server certificate (and users often use self-signed certs which are not secure). Most Alta users appreciate the streamlined simplicity of a Let’s encrypt secure certificate out-of-the-box. We do plan to add support for custom certificates, but wanted to prioritize the easier experience first.
6: This is expected behavior, as you will always have the most visibility into device usage and configuration when using a full stack of components from the same network vendor. You will unlock the full potential of AltaPass when using Alta Labs’ Access Points.
We’ve already just added the Network tab to the Settings, which should make an overall view of your VLANs and WANs much more straightforward.
Please give steps on how you are changing your subnet, or even take a video of it, and we can try to understand what’s going on. We have plenty of users with non-default subnets.
Attached is what I currently see during the setup process. I strongly believe that adding an option to configure VLAN 1directly on the first screen of the Route10 setup (where we can also enter the controller URL) would be a help a lot. It would address many of the issues I outlined above, such as subnet conflicts and unnecessary setup complexities.
I have also recommended Route10 to a few friends, and they’ve purchased it based on my suggestion. All of them are eagerly looking forward to this feature of VLAN 1 configurability on 192.168.1.1 screen. It would significantly enhance the usability and make the setup process much more seamless.
Additionally, if you observe, several other issues being discussed in this forum also seem related to this limitation.
Could you please prioritize this feature in future updates? It would be a huge improvement to the overall experience and resolve many recurring frustrations for both new and existing users.
@mark Yes, the only way to send alerts is through our cloud service currently, which is the easiest and most straightforward user experience. Eventually, along with the ability to configure your own certificates, will be the ability to set an SMTP server with credentials.
@prmadhava The controller setup is a different process than the Route10 setup. Let’s focus on each one at a time. In your case, your mobile device is most likely not on the 192.168.1.x network during BT setup, at least not on Route10’s 192.168.1.x LAN network. What is your Control plugged in to? It is always recommended that the Control be plugged into a Route10 LAN port, and then your mobile device should be able to reach the Control device, but your mobile device will also need to be on the Route10 LAN network in order to reach the Control device.
Manually added the controller URL within the 192.168.1.1 controller interface.
After adding the URL, Route10 appeared on the controller interface.
Configuring VLAN via Controller Interface:
Selected the Route10 icon in the controller interface to enter its configuration menu.
There was a button “Settings” and that is it which I thought was not normal, but any way clicking the “Settings” button had no effect, preventing further VLAN configuration.
Switching to the Mobile App:
Tried configuring VLAN settings through the Alta mobile app.
Added the controller using local.xxx.ddns.alta.inc; Route10 appeared, along with VLAN configuration options.
Changes made in the app did not persist after saving.
Reverting to Docker Setup:
After multiple unsuccessful attempts, both the controller and Route10 remained on the 192.168.x.x subnet.
Chose to revert to the previous Docker-based controller setup, which provided more predictable results.
@Alta-Jeff , just to clarify, want to ensure it is not lost that that we recognize that Route10 is not only affordable but also impressively fast 10G router. I truly appreciate all the work you guys are putting into it, and I’m glad to be learning so much as I go along. I know there are other features, like “Filters,” that you’re currently refining, and I’m genuinely looking forward to seeing how those enhancements evolve over time.
@paddynora123 I cannot provide a timeline, but I can say that most users are able to change subnets, if desired, without issues. It does require the typical “reboot” of the network to do so.
@prmadhava Can you please answer my question about topology and how everything is connected? For example:
ISP->Existing Router->LAN->Route10->Control
or something similar?
Here are the steps I would take to get your subnet switched. I just successfully tried them here:
Plug Route10 WAN port into a working network.
Hold down Reset button while powering on the Route10, and wait 3 minutes. This will ensure that Route10 has the latest firmware.
Replace your main router with Route10 (WAN to ISP, LAN to your laptop), and go to 192.168.1.1 in a browser, just to make sure it is connected to the Internet. If it’s not connected, configure it so that it is connected to the Internet.
Plug the Control device into the Route10’s LAN, then hold the reset button down while powering it on. Wait 4-5 minutes for it to factory reset and download/install the factory firmware. The LED will be solid white when done.
Set up the Control device via browser (192.168.1.11 in your case).
Make sure your controller is on the latest version (Settings->System)
If Route10 does not show up automatically on the controller, go to the Route10’s IP address in a browser, and copy/paste your controller URL (https://local…ddns.manage.alta.inc, etc. without the /site/… suffix), and click “Connect to Controller”. It should then show up in the Network list on the controller.
Click Set Up next to the Route10.
Wait for the Route10 to start streaming stats, then change the subnet on VLAN1 to your desired subnet (click on the Route10 icon, then the pencil next to VLAN1). Wait 30 seconds for the changes to sync.
Power cycle both the Route10 and Control device. After a few minutes, the Control device will have an IP address on the new subnet, and the IP address for the local…ddns.manage.alta.inc will automatically update to the new IP. At this point, the Route10 device will then be able to reach the controller on the new subnet.
My guess is that the key gotcha is that you may need to set the controller URL on the Route10 before it will show up in the controller. Please let me know if you get hung up anywhere on these steps.
I just completed a setup on Route 10 on Friday. It was simple, but also you need to get an
advanced IP scanner program for your computer. I struggled with finding Ip addresses
with cameras. It really helps. Also I left out, when you reset and connect to the Route 10,
make sure you verify the ipconfig on your computer, 192.168.1.?
here it is till step 7 goes well and then it fails. I am attaching the video. I restarted the devices that is when you see that the device and controller become unreachable and then show up but this shows the issue I was mentioning
@prmadhava Based on the video it looks like you skipped step 6, which is to ensure that the controller is on the latest version. Can you please double-check that, and try again?
I thought I was on the latest version, as I waited for about 10 minutes for it to settle down. I will double-check to confirm.
A few observations and questions I had:
Upgrade Retention After Reset:
Do I need to upgrade the Route10 and Controller every time I reset it?
I believe I upgraded to the latest version (1.3n) before performing the reset, so I was expecting the upgrade to be retained even after reset as it is intuitive. Is this the expected behavior, or could I be missing something?
Route10/Controller Activation on Every Reset:
I noticed that activation is required every time the controller is reset. While I understand the need for activation initially, having to reactivate after each reset feels a bit redundant, especially for a device intended for offline use.
Account Setup for Local Operation:
I’ve observed that setting up a new account requires an email activation from Alta servers, even for a local account. In comparison, devices like my Omada TP-Link router and others I used previously allowed a fully local setup without needing additional steps. Is there a specific reason for this requirement?
I appreciate any clarification on these points. Overall, I’m just trying to ensure I’m following the best practices for setup and operation.
I wanted to share an update regarding the firmware situation I’ve been experiencing. Initially, my Home Base dashboard indicated that everything was up to date. However, I noticed that under System > Firmware, the “Check for Updates” button was unresponsive, and the firmware version remained at 1.0h.
Upon checking online, I discovered that the latest version available is 1.0o. Despite multiple attempts, the firmware did not update automatically or manually through my AT&T Nokia modem.
After trying several troubleshooting steps, I connected a different device—a WiFi-to-Ethernet adapter—to my hotspot. Once connected, I clicked “Check for Updates” again, and the firmware successfully updated to 1.0o.
It appears that, for some reason, the updates were not processing either automatically or manually through the AT&T Nokia modem. If anyone has insights or similar experiences, I’d appreciate your input!
Upgrade Retention: The “Firmware Reset” (holding reset during power on) will revert to the latest Factory Release, which is not necessarily the latest production release. So you will likely need to update after you perform a Firmware Reset. This is similar to all of our other devices. Once a production release has been vetted from the factory, then we will update these periodically.
Activation on Every Reset: Yes, this is required because the device is completely wiped when performing a reset, and needs new tokens for Dynamic DNS to work properly when being set up. The expectation is that you do not need to reset very often, if ever.
Account Setup for local operation: This is for enhanced security, as well as convenience in account recovery (in case you forget the password). At some point you will be able to use your own SMTP server, but each account will still need to be tied to an email address.
If you can ssh into the Control device and grab the logs (journalctl), you may be able to understand better why it was unable to reach out for an update via your Nokia modem.
@prmadhava Are you still having issues updating the controller? As long as there is a good internet connection, we are having a difficult time reproducing any issues on our end. Also, if all of your issues are resolved, can you resolve this thread?